Windows 7 includes Reliability Monitor and Resource
Monitor to simplify how you isolate the source of hardware problems,
allowing you to reduce client computer downtime. Additionally, Windows 7
includes several troubleshooting features first introduced with Windows
Vista. The following sections describe these improvements.
1. Windows Troubleshooting Platform
The Windows Troubleshooting
Platform, new to Windows 7, is an extensible infrastructure for
automated diagnosis of software and hardware problems. If you used
Windows Network Diagnostics in Windows Vista, you're familiar with how
Windows Troubleshooting Platform works.
To the user performing
the troubleshooting, the Windows Troubleshooting Platform is a wizard
that attempts to identify the source of the problem and might provide
instructions to the user for solving the problem or might solve the
problem directly. Users can launch a troubleshooting pack from several
different locations. For example, if Windows Internet Explorer cannot
open a Web site, the user can click the Diagnose Connection Problems
button to launch Windows Network Diagnostics (implemented using the
Windows Troubleshooting Platform). Users can also launch troubleshooting
packs from Control Panel (located at Control Panel\All Control Panel
Items\Troubleshooting) or Help And Support.
1.1. Built-in Troubleshooting Packs
Windows 7 includes
built-in troubleshooting packs to correlate to the top 10 categories of
Microsoft support calls, including power efficiency, application
compatibility, networking, and sound. Table 1
describes the troubleshooting packs that are built into Windows 7 or
are currently available using the Windows Online Troubleshooting Service
(WOTS). WOTS is a free online service that Windows 7 can use to
download new or updated troubleshooting packs.
Table 1. Windows 7 Troubleshooting Packs
| TROUBLESHOOTING PACK | DESCRIPTION |
|---|
| Aero | Troubleshoot problems that prevent your computer from displaying Aero animations and effects |
| Playing Audio | Troubleshoot problems that prevent your computer from playing sound |
| Recording Audio | Troubleshoot problems that prevent your computer from recording sound |
| Printer | Troubleshoot problems that prevent you from using a printer |
| Performance | Adjust settings in Windows that can help improve overall speed and performance |
| System Maintenance | Clean up unused files and shortcuts and perform other maintenance tasks |
| Power | Adjust power settings to improve battery life and reduce power consumption |
| HomeGroup | Troubleshoot problems that prevent you from viewing computer or shared files in a HomeGroup |
| Hardware And Devices | Troubleshoot problems with hardware and devices |
| Internet Explorer Performance | Troubleshoot problems that prevent you from browsing the Web with Internet Explorer |
| Internet Explorer Safety | Adjust settings to improve browser safety in Internet Explorer |
| Windows Media Player Library | Troubleshoot problems that prevent music and movies from being shown in the Windows Media Player Library |
| Windows Media Player Settings | Reset Windows Media Player back to default settings |
| Windows Media Player DVD | Troubleshoot problems that prevent playing a DVD in Windows Media Player |
| Connection to a Workplace Using DirectAccess | Connect to your workplace network over the Internet |
| Shared Folders | Access shared files and folders on other computers |
| Incoming Connections | Allow other computers to connect to your computer |
| Network Adapter | Troubleshoot Ethernet, wireless, or other network adapters |
| Internet Connections | Connect to the Internet or to a particular Web site |
| Program Compatibility | Troubleshoot a program that doesn't work in this version of Windows |
| Search And Indexing | Troubleshoot problems finding items with Windows Search |
| Windows Update | Troubleshoot problems preventing Windows Update from working correctly |
1.2. Windows Troubleshooting Platform Components
The Windows Troubleshooting Platform consists of three main components:
Windows troubleshooting packs
A collection of Windows PowerShell 2.0 scripts that diagnose and
resolve problems. Because they are based on Windows PowerShell,
administrators with scripting experience can create their own
troubleshooting packs. You can use this capability to automate
troubleshooting of problems unique to your environment, such as those
relating to your internal applications or network.
Windows troubleshooting engine
The tool that runs the troubleshooting pack's Windows PowerShell
scripts. The Windows PowerShell scripts within a troubleshooting pack
use a set of developer interfaces provided by the troubleshooting engine
to identify root causes, prompt the user for information, and mark
problems as resolved.
The troubleshooting wizard
The primary user interface for the troubleshooting packs. The wizard
first displays the publisher and description of the troubleshooting pack
to the user. The Windows PowerShell scripts within the troubleshooting
pack can prompt the user through the wizard interface. After the
troubleshooting pack has completed, the wizard displays the
troubleshooting results in a report. You can bypass the wizard interface
to run the troubleshooting pack from a command line or use Extensible
Markup Language (XML)–based answer files to run a troubleshooting pack
automatically.
1.3. Creating Custom Troubleshooting Packs
The Windows 7 Software Development Kit (SDK), a free download from http://download.microsoft.com,
includes the Windows Troubleshooting Pack Designer in the
\Bin\TSPDesigner folder. You can use the Windows Troubleshooting Pack
Designer to create your own troubleshooting packs to troubleshoot common
problems not covered by the built-in troubleshooting packs.
Troubleshooting packs are also a convenient way to maintain computers;
by scheduling them to run in an automated way, you can use
troubleshooting packs to detect and resolve common problems without user
intervention.
Users can run
stand-alone troubleshooting packs packaged as .diagcab files. The
.diagcab file format is a specialized archive that contains each of the
troubleshooting pack scripts. When packaged as a .diagcab file,
troubleshooting packs can be distributed using Group Policy preferences,
Microsoft System Center Configuration Manager (either during or after
deployment), or non-Microsoft software distribution tools. For external
customers, you could post the .diagcab files to a Web site and direct
your users to open the Uniform Resource Locator (URL) when they
experience a problem.
1.4. Running Troubleshooting Packs Remotely
You can run a
troubleshooting pack across the network on a remote computer, which can
allow you to diagnose common problems quickly and possibly solve them
without walking the user through the troubleshooting process. The
following Windows PowerShell commands, when run on a Windows 7 computer
(either locally or remotely using Invoke-Command
or the *-PSession cmdlets), will run the built-in Windows Aero
troubleshooting pack, automatically attempt to resolve any problems, and
store the results to the C:\DiagResult folder.
Import-Module TroubleshootingPack
$aero = Get-TroubleshootingPack $env:SystemRoot\Diagnostics\System\Aero
Invoke-TroubleshootingPack -Pack $aero -Result C:\DiagResult -unattend
You could also use this
technique in a script to run a troubleshooting pack on multiple
computers across the network; in combination with a custom
troubleshooting pack, you could quickly determine which computers
suffered from a specific problem or misconfiguration. Because troubleshooting
packs can make configuration changes to solve problems, you could use
this approach to detect and resolve a common problem without contacting
users or manually connecting to computers.
2. Reliability Monitor
Two of the biggest
challenges of troubleshooting hardware problems are determining when the
problem began occurring and what might have changed on the computer to
introduce the problem. Windows Vista introduced the Reliability
Monitor snap-in (as part of the Computer Management console) so that
you can easily view application installations, driver installations, and
significant failures over several weeks or months.
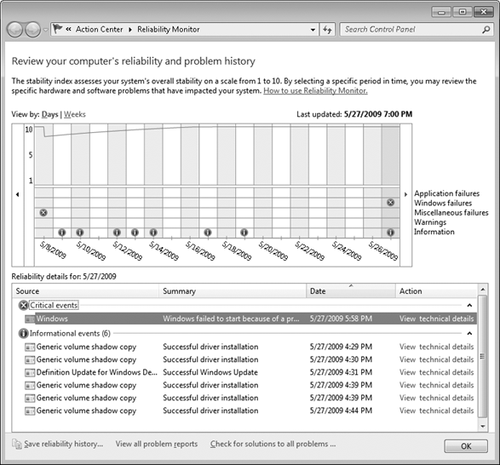
With Windows 7, Reliability Monitor is now integrated with the Action Center to better correlate system changes and events. Figure 1
shows Reliability Monitor providing details about events on a specific
day, including a failed application installation and security updates.
Beyond the improved user
interface, Windows 7 extends Reliability Monitor by exposing reliability
data via the Windows Management Instrumentation (WMI). Using WMI, you
can gather reliability data remotely and process it using Windows PowerShell scripts and WMI-related cmdlets (pronounced command-lets). Now, you can use WMI to centrally monitor the reliability of computers running Windows 7 throughout the network.
Management tools
such as Microsoft System Center Configuration Manager and Microsoft
System Center Operations Manager can centrally monitor the reliability
data from all computers running Windows 7, or you can create your own
Windows PowerShell scripts to monitor reliability. By centrally monitoring
reliability data, you can identify unreliable computers that are
affecting user productivity even if the users don't take the time to
call the Support Center.
3. Resource Monitor
IT professionals need
deep insight into a computer's inner workings to efficiently
troubleshoot problems. The more complex the problem is, the more
detailed the information must be. For example, although Task Manager is
sufficient to identify the process that is using the most processor
time, IT professionals need a more powerful tool to identify which
process is generating the most disk or network input/output (I/O).
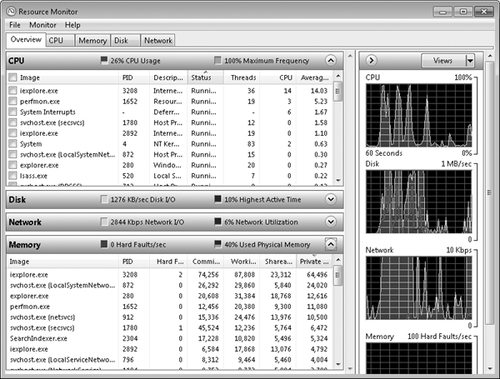
To give IT professionals
detailed information about resource utilization on a process-by-process
basis, Windows 7 includes an improved version of Resource Monitor. As
shown in Figure 2,
Resource Monitor displays this data in a format that provides rapid
access to a great deal of information that you can use to easily explore
process-specific details.
Within seconds, you can use Resource Monitor to view:
Which processes are using the most processor time and memory.
Which processes are reading and writing the most data to the disk.
How much network data each process is sending and receiving.
How much memory each process is using.
Why a process is nonresponsive.
Which services are hosted within a SvcHost.exe process.
Which handles, including devices, registry keys, and files, a process is accessing.
Which modules, including dynamic-link libraries (DLLs) and other libraries, a process is accessing.
Which processes are listening for incoming network connections or have network connections open.
Additionally, you can end
processes and search online for information about a process. With
Resource Monitor, IT professionals can quickly identify the source of
performance and resource utilization problems, reducing the time
required to troubleshoot complex issues.
4. Windows Memory Diagnostics
Application failures,
operating system faults, and Stop errors are often caused by failing
memory. Failing memory chips return different data than the operating
system originally stored. Failing memory can be difficult to identify:
Problems can be intermittent and might occur only under very rare
circumstances. For example, a memory chip might function perfectly when
tested in a controlled environment but begin to fail when the internal
temperature of the computer becomes too high. Failing memory can also
cause secondary problems, such as corrupted files. Often, administrators
take drastic steps to repair the problem, such as reinstalling
applications or the operating system, only to have the failures persist.
Windows includes Windows
Memory Diagnostics to help administrators track down problems with
unreliable memory. If Windows Error Reporting (WER) or Microsoft
Online Crash Analysis (MOCA) determines that failing memory might be
the cause of an error, the software can prompt the user to perform
memory diagnostics without requiring an additional download or separate
boot disk. Additionally, you can run Windows Memory Diagnostics by
choosing a special boot menu option or by loading the Windows Recovery
Environment.
If memory diagnostics
identify a memory problem, Windows can avoid using the affected portion
of physical memory so that the operating system can start successfully
and avoid application crashes. Upon startup, Windows provides an
easy-to-understand report detailing the problem and instructing the user
on how to replace the memory.
5. Disk Failure Diagnostics
Disk reliability
problems can vary in severity. Minor problems can cause seemingly random
application failures. For example, if a user connects a new camera and
the operating system fails to load the driver, disk corruption may be
causing the problem. More severe problems can result in the total loss
of data stored on the hard disk.
Windows can eliminate much of
the impact of a disk failure by detecting disk problems proactively,
before total failure occurs. Hard disks often show warning signs before
failure, but earlier Windows operating systems did not record the
warning signs. Windows now checks for evidence that a hard disk is
beginning to fail and warns the user or the Support Center of the
problem. The IT department can then back up the data and replace the
hard disk before the problem becomes an emergency. For administrators,
Windows acts as a guide through the process of backing up their data so
that they can replace the drive without data loss.
Most new hard disks include Self-Monitoring Analysis and Reporting Technology (SMART) and Disk Self Tests (DSTs). SMART
monitors the health of the disk using a set of degradable attributes,
such as head-flying height and bad block reallocation count. DSTs actively check for failures by performing read, write, and servo tests.
Windows queries for SMART
status on an hourly basis and regularly schedules DSTs. If Windows
detects impending disk failure, Windows can start disk
diagnostics to guide the user or IT professionals through the process
of backing up the data and replacing the disk before total failure
occurs. Windows can also detect problems related to a dirty or scratched
CD or DVD and instruct the user to clean the media.
You can configure
disk diagnostics using two Group Policy settings. Both are located in
Computer Configuration\Policies\Administrative
Templates\System\Troubleshooting And Diagnostics\Disk Diagnostic.
Disk Diagnostic: Configure Execution Level
Use this policy to enable or disable disk diagnostic warnings.
Disabling this policy does not disable disk diagnostics; it simply
blocks disk diagnostics from displaying a message to the user and taking
any corrective action. If you have configured a monitoring
infrastructure to collect disk diagnostic events recorded to the event
log and prefer to manually respond to events, you can disable this
policy.
Disk Diagnostic: Configure Custom Alert Text
Enable this property to define custom alert text (up to 512 characters)
in the disk diagnostic message that appears when a disk reports a SMART
fault.
For disk diagnostics to work, the Diagnostic
Policy Service must be running. Note that disk diagnostics cannot
detect all impending failures. Additionally, because SMART attribute
definitions are vendor specific, different vendor implementations can
vary. SMART will not function if hard disks are attached to a hardware
redundant array of independent disks (RAID) controller.
Note:
Many hardware vendors use SMART failures as a warranty replacement indicator.
6. Self-Healing NTFS
Windows Vista and Windows 7 include self-healing
NTFS File System (NTFS), which can detect and repair file system
corruption while the operating system is running. In most cases, Windows
will repair file corruption without disrupting the user. Essentially, self-healing NTFS functions similarly to ChkDsk, but it works in the background, without locking
an entire volume. Specifically, if Windows detects corrupted metadata
on the file system, it invokes the self-healing capabilities of NTFS to
rebuild the metadata. Some data may still be lost, but Windows can limit
the damage and repair the problem without taking the entire system
offline for a lengthy check-and-repair cycle.
Self-healing NTFS is enabled
by default and requires no management. Instead, it will serve to reduce
the number of disk-related problems that require administrative
intervention. If self-healing fails, the volume will be marked "dirty,"
and Windows will run ChkDsk on the next startup.
7. Improved Driver Reliability
Drivers should be more
reliable in Windows Vista and Windows 7 than they are in previous
versions of Windows. Improved I/O cancellation support is built into
Windows Vista and Windows 7 to enable drivers that might become blocked
when attempting to perform I/O to gracefully recover. Windows Vista and
Windows 7 also have new application programming interfaces (APIs) to
allow applications to cancel I/O operations, such as opening a file.
To help developers create more stable drivers, Microsoft provides the Driver Verifier. Developers can use the Driver
Verifier to verify that their drivers remain responsive and to ensure
that they correctly support I/O cancellation. Because driver response
failures can affect multiple applications or the entire operating
system, these improvements will have a significant impact on Windows
stability. This improvement requires no effort from administrators; you
will simply benefit from a more reliable operating system.
8. Improved Error Reporting
Windows 7 offers improved
application reliability, and the new error reporting capabilities allow
applications to continue to become more reliable over time. In earlier
versions of Windows, application response failures were very hard for
developers to troubleshoot, because error reporting provided limited or
no information about them. Windows Vista and Windows 7 improve error
reporting to give developers the information they need to permanently
resolve the root cause of the problems, thus providing continuous
improvements in reliability.